D-Link DNS-323 NAS Tips & Tricks
Oh, my DNS-323 is sold! Thanks to one of the readers and nice meeting him (I do not want to disclose his name here) ;) Fortunately he found my lelong post at Jacko.MY not from Ebay and Lelong.com.my 'cause I listed the NAS at higher price at both trading sites than Jacko.MY and he got further discount upon meet up! Perhaps this is one of the privileges to be the follower of Jacko.MY. Hehe...
Anyway, this is not a thank you post, but I would like to share the information that I have collected upon the first day when I owned the NAS, especially to the new owner. This info is not exclusive info that I own, but it's the summary that I collected all over the internet. And before I get onto it, I guess it may be good to provide a quicker guide that is quicker than quick start up guide provided by D-Link.
Since it's a network device, you will need to make sure your network device such as wireless router or ethernet network switch is ready for the NAS. If you have DHCP enabled, it's easier, just plug in the NAS and power it up. If you are not, read the manual for the default IP (I believe it's 192.168.1.32) of DNS-323 and configure your workstation to be in the same subnet with the NAS. I would strongly recommend to enable DHCP on your router for headache free setup.
Next, logon to your router. Check on the DHCP page if the NAS is listed as one of the clients. An advanced step, if your router support reserved IP for client in the DHCP server, I would recommend you to assign an IP from the DHCP IP pool to the NAS. Meaning, the DHCP server will always assign the same IP to NAS, not to any other client on the same network. Something like this...
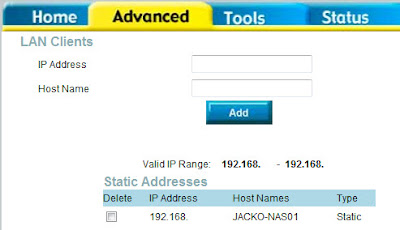
The snapshot is only for reference only, different router has different settings, do check out the manual.
This eases the configuration if you want to run other services from NAS over to internet. You can also use the bundled Easy Search Utility (ESU) to fix an IP to DNS-323 and run DHCP server from the NAS, but I would think it's good to centralize the network management responsibility to the router for easy troubleshooting and management, rather than configure the different network settings at each networked device at your home network, you might have conflict settings over time and it's difficult to troubleshoot then.
Once your NAS is successfully connected to your home network, now you can either use the ESU to enter the setup page or directly launch your internet browser (of course you need to format your harddisk first but I would not cover the steps over here, read the manual). For former option, download the latest ESU from D-Link site. The latest ESU also allows you to install BitTorrent program onto NAS.
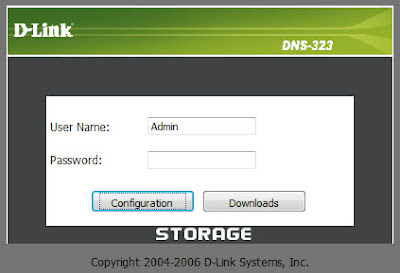
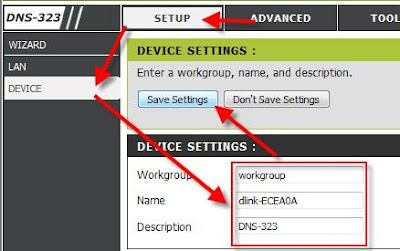
Click on Configuration to enter the setup page. Go to Setup - Device page. Set the workgroup to the same workgroup with your Windows workstations...
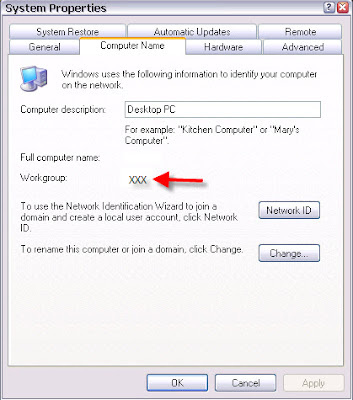
You can get the workgroup information by right clicking on My Computer - Properties - Computer Name...
Click Save Settings once done.
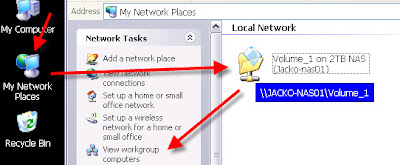
Up to now, you should be able to access the NAS from your network. Double click on My Network Places, you should be able to see a network folder Volumn_1 automatically. If not, click on View Workgroup Computers to locate DNS-323, it should appear as the name that you configured in steps above...
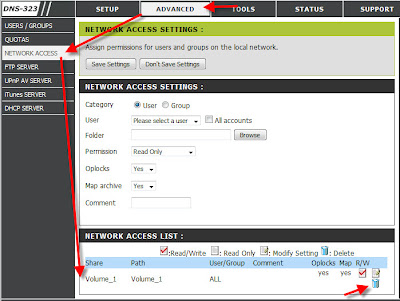
By default, everyone on your network has read/write access to the NAS. If you want to restrict it, create an ID on the NAS that has identical ID and password like your Windows ID, remove the default network access share, recreate the share to Volumn_1 and assign the ID to have read/write access...
Check out the manual for more details.
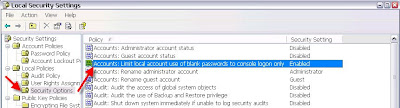
Most users have no password on their Windows machine, and they may have difficulty to access the NAS after the lock down. Try go to Control Panel - Administrative Tools - Local Security Policy. Expand Local Policies - Security Options and disable "Accounts: Limit local account use of blank passwords to console logon only"...
I do not guarantee it works, but worth trying it out. The best way is to have password for each Windows ID for tighter security.
If you want to access your files via FTP from internet, it's good to register an ID and free domain name at Dynamic DNS. If your router support DynDNS, then configure your router with the ID and password of your DDNS account as well as the host name (domain name) that you registered for your FTP. Once done, configure the port forward at your router to forward port 21 to the NAS.
That's all for the start up of DNS-323. Other features like iTunes and UPnP is pretty straight forward that you can refer to manual for details. You may need to install the PNP-X driver on your Windows machine for UPnP to work properly. Download it from D-Link website. If you can't find it in the local site, go to D-Link's US site to look for it.
To be geekier, check out D-Link forum and you may get support from D-Link engineers directly. Also, find more fun from hack forum that you can learn how to add more applications to the NAS. There is one wiki site too for your reference. It's fun to hack the NAS and it's simple to do so for certain hacks, but be extra cautious to follow exactly the steps recommended by other users 'cause one simple mistake may brick your NAS.
Have fun! ;)


wah. got tutorial & after sales service somemore. benefits of being a reader ho
ReplyDeleteOf course bah! ;) Next time may be can come out member card. LoL...
ReplyDelete