How To Upgrade MSI Wind's Harddisk
Hooray, I am back!!
Probably from the title some could have guessed my Wind was out for business due to some make over. Yes, indeed I couldn't wait anymore for the warranty to expire, I went ahead to upgrade the stock 80GB harddisk to a 320GB! ;) Tempted on 500GB but it's still very new, hence expensive in Malaysia and sorta over my budget and does not fit into my "2-year Mega Project". Hehe...
Also, I was searching high and low, left and right, in and out, front and back the whole IT mall, Low Yat for a better performance 7200rpm 16MB buffer harddisk. But to my extreme disappointment, none of the shop selling it. Sigh~
On the other hand, to upscale my lovely Wind's performance, I also attempted (again) a Mushkin DDR2 2GB RAM stick since I've updated my BIOS to official version 1.06 and the cover was opened. Result, no avail. Though, 3GB RAM may not be effective in boasting the performance (technically due to memory address per Mark's blog, my favorite tech blog. Ah~ that also affirms my suspect why HP Mini has only 1789MB 'detected' RAM) as I am running 32-bit OS. But a 2GB stick is so dirt cheap to get more nowadays and psychologically I might feel the improvement, if not technically. Hehe...
Okay, enough talk cock. Let's move on to the operation room for a surgery on Wind.
Before you begin, one thing to consider is how are you going to transfer your OS and files from the old to new harddisk. If you are running Vista (certain edition), you can use the Complete PC Backup option to create an image to be restored to the new harddisk. If XP, recommend Partition Magic or Norton Ghost. Linux and Mac OS X, I am clueless :") but perhaps P Magic and N Ghost still fit the work.
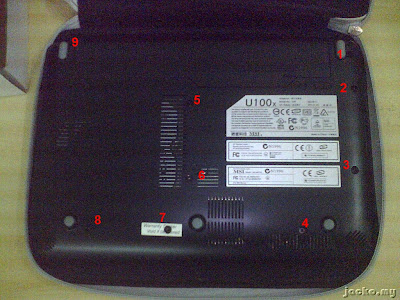
Turn your Wind with bottom faces up. Rest it on the slipcase is the best idea so the glossy top does not get scratch. Remove the battery and any other connected peripherals like thumb drive including power.
Total of 9 philip screws to be loosen as shown above. Once unscrewed, use your finger nail to unlock the clips inside the cover...
There are many clips along the side but take note on the green arrows, these are bigger clips and more fragile. Do not force open. You can easily leave up the bottom cover if all the clips are freed.
There you go.
From the left, the wireless minicard module, 2 harddisks at the center and the fan on the right. Wind has 2 harddisks?! Ha! On the right is the new Seagate Momentus ST9320320AS 320GB SATA harddisk :p Here's the real Wind's internal...
2 more screws to go. The wireless module must be taken off in order to make the replacement. Unscrew then push or pull the card follow the arrow direction...
Now the last one appeared. Remove it before we can disconnect the harddisk from the mobo...
Now try to lift up the harddisk slightly by holding the black stripe. If it can be lifted, all screws have been opened, else look properly to identify the locked screws.
First, leave it up slightly. Second, pull the stripe outward slowly as per the photo above. You can use the other hand to push the harddisk too, the SATA connection isn't tight though.
Now, the last 2 screws to go, to migrate the bracket to the new harddisk. Before...
After...
Make sure you push the bracket towards the harddisk before you lock the screw so there is no gap left between the L-shape bracket and the harddisk.
Now, reverse everything above to dock the new harddisk. C'mmon, you can do it without guidance! ;)
Power on Wind, continuously press DEL button until the BIOS screen shown. Go to IDE Information and verify if the new harddisk is detected. If not, review the steps above and make sure the harddisk is slotted into its base properly. Hopefully it's not due to faulty unit.
Done! Good job!
I was given 2 brands when at the mall, Seagate Momentus and Western Digital Scorpio. I chose Seagate over WD as the stock 80GB was WD Scorpio series too. 3 reasons:
1. If you search through Vista forums, some users encountered a weird system crash with error "logon process has failed to create the security options dialog". No root cause determined yet but a common between cases was the users were on WD harddisk with some of them failed the SMART diagnostics. Interesting to find out if it's really WD (I doubt so) or Micro$oft the culprit.
2. Simply, I looked at the power rating on the label. Seagate is 0.451A and WD is 0.55A (or 0.51A, can't recall exactly). I assumed Seagate consumes less power than WD but checked on both websites seem to prove me wrong. Hmm...
3. See below.
Lastly, why I was so eager to upgrade now than later upon warranty expiry? 2 justifications:
1. I need the disk space.
2. Kiasu lah. After knowing Mini's Tosh HDD performed better than Wind's WD, I felt so uneasy. Haha! This is also why I did not pick WD as I worried WD would lose to Tosh in WEI again. Hihi... Very kiasu hor? :p
So how's the performance? Per my previous post, Stock WD 80GB scored 4.8 and Mini's Tosh 120GB scored 5.2. But now, most important, announcing new Seagate 320GB in Wind scores...
Yip yip hooray! Yoohoo! :)
Wind the winner! Hehe...
You might curious the performance on Seagate. If you compare the spec by links above, WD is better. So far practically it (Seagate) is good and I have not experienced any lagging compared to stock WD. One thing to note, it generates slightly more noise (sound like shhh chhh) than the stock WD 80GB but it's bearable (to me). Heat, I feel WD is warmer.
Unless 2GB RAM stick is supportable with new BIOS release, this could be the last time I open the bottom. I'm now looking for further enhancement on Wind usage. More to come...


Thanks man. It is nice to see Malaysian to like to share their knowledge through blogging. Good one! Keep it up!
ReplyDeleteGlad it helped, Eddy.
ReplyDelete