Turn Your Windows 7 Into A Wifi Access Point
I always travel with 2 lappies, one is company and the other is personal...

In the past, it used to be very easy to get free internet service in foreign countries especially in Asian countries. Or at least it's easy to share the subscribed service with more than one computer. However, nowadays the provider charges the service per computer...

Hey, SGD$27 per computer, I would have to pay $54 everyday! Imagine if the currency is in USD or Euro. Furthermore, most of the times you only get a single ethernet connection and no wifi in the hotel room...

So you can't connect to instant messenger on your personal lappy while replying work email on company lappy.
Well, there's always some workaround. If you own a Windows 7 lappy (time to upgrade if you don't), you can set it up as an access point allowing other lappies to connect to it and browse internet as if they are connected to a typical wifi access point. Let's see how to do it...
One requirement is your lappy must equip with wireless adapter. *_* Whose W7 lappy doesn't come with wifi adapter?! Hehe... As mentioned, second requirement is you must have a Windows 7 lappy. I don't know if W7 Home Basic and Starter come with the feature, but no worries if yours is W7 Home Premium and above. Perhaps one way to check is to enable the wireless adapter and check if there is a wireless adapter called Microsoft Virtual WiFi Miniport Adapter automatically appear in Network Connections...

If you don't see that, I guess either your W7 edition does not come with it or your real wifi adapter is not compatible with it.
There are 2 ways of setting up. Go for method 1 if you are not adventurous into technical or otherwise read on for method 2. Before you proceed, I would assume that you've plugged in the ethernet connection to your W7 lappy and you've subscribed to the internet service and able to browse internet as usual on W7 lappy.
Method 1
Download this free software, namely Connectify. Install it onto your W7 lappy and follow this tutorial to setup your W7 virtual access point...
Download this free software, namely Connectify. Install it onto your W7 lappy and follow this tutorial to setup your W7 virtual access point...
Method 2
This method uses command line interface to configure the access point. Before get into the text based configuration, you must know the adapter name of the Microsoft Wifi Miniport which is going to be the access point. You will also need to enable ICS or Internet Connection Sharing for the adapter that has internet connection. In this example (refer to snapshot above), the access point adapter is named Wireless Network Connection 2 and the internet connection is on Local Area Connection (the ethernet connection connected to hotel room internet).
This method uses command line interface to configure the access point. Before get into the text based configuration, you must know the adapter name of the Microsoft Wifi Miniport which is going to be the access point. You will also need to enable ICS or Internet Connection Sharing for the adapter that has internet connection. In this example (refer to snapshot above), the access point adapter is named Wireless Network Connection 2 and the internet connection is on Local Area Connection (the ethernet connection connected to hotel room internet).
Now right click on Local Area Connection and select Properties. Go to Sharing tab and make it similar to below:
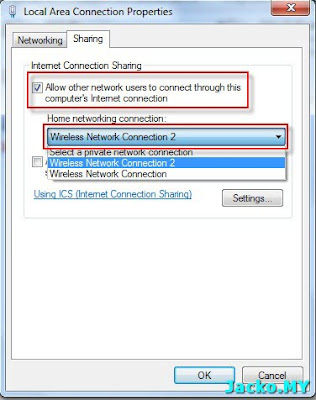
ICS is not new to Windows, it can be found in older version of Windows. In above setting, we simply enable internet connection sharing on Local Area Connection to Wireless Network Connection 2 which is going to be the access point for other computers to access internet.
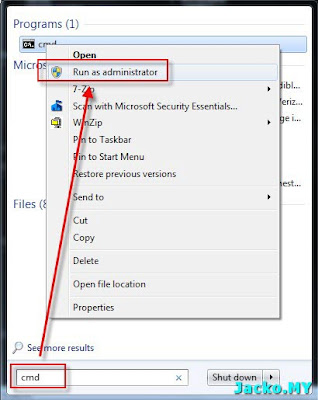
Next, open a command prompt window, you may want to open it in elevated mode...
Enter this command
netsh wlan set hostednetwork mode=allow ssid=YourVirtualNetworkName key=YourNetworkPassword
netsh wlan set hostednetwork mode=allow ssid=YourVirtualNetworkName key=YourNetworkPassword
You need to provide your own value for bold text, YourVirtualNetworkName and YourNetworkPasswod...

In example above, I replace YourVirtualNetworkName with TNS and some alphanumeric characters for YourNetworkPassword (I masked it) respectively.
Next, enter netsh wlan start hostednetwork to start the access point...

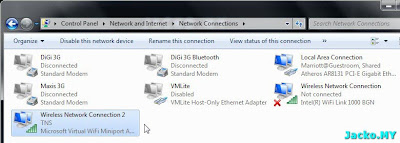
Go back to Network and Connection window you should see the Wireless Network Connection 2 is now activated with the network name (TNS) you provided...
Now you can go to another lappy, follow the usual way to scan the available wireless network. You should see TNS (or whatever name you gave previously). Connect to it with the password you entered just now and voila...
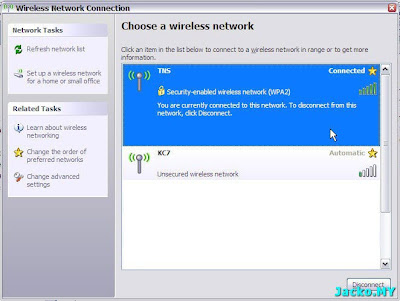
Now both lappies can browse internet with a single paid internet service!! ;)
Try it out now. Not on W7 yet?? Time to upgrade then!
Credits to Eric Geier whose article helped me on this...


Comments
Post a Comment