My NAS Project Part 2
This post is not a review but the "enhanced" quick installation guide (QIG) of what was missed out in the QIG by Synology. Perhaps the color photos here give you better illustration over the black and white QIG. Synology should produce a colored version of QIG since it's given out as soft copy, virtually no difference in their cost.
First, read the QIG from Synology. For novice, I recommend to print a copy before you begin, or at least have it open on your PC and perform the installation side by side with the PC.

Place a soft cloth to hold the NAS if you worry about scratches. So you slide the housing to the right so that the indicator aligned with the "Open" like this...

There you go. Lift up the top part, the housing split into two and ready to swallow 2 HDDs into its stomach...

Position the base with the fan like the photo above for easy slot in the HDD later.
Connect the data and power cable onto the HDD...

The QIG doesn't clearly indicate which end of the cable to connect to the HDD. One end of the cable (both power and data) is an L-shape (the right side)...
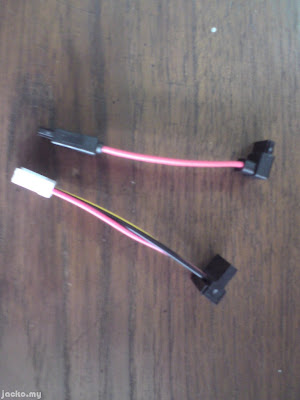
Connect the L-shape end of both the power and data cables to the HDD. Also you should use the shorter cables for Disk 1, the HDD that you are going to slot into the bottom bay.
Now slot in the first HDD, namely Disk 1 into the bottom bay. Take note on the label on the base, connect the power and data cable to the connectors labeled with Disk 1 accordingly...

Secure the HDD with the provided screws...

As you can see from the photo, you should use a thin and long screw driver for this task, otherwise you may not be able to tighten the screw properly with one screw on the base obstructing the screw driver.
Repeat steps above if you have second HDD to install.
Now close the housing and reverse the sliding direction to lock the base...

The indicator should now align with the "Close" if it's close properly. 2 more screws to lock the housing at the rear so that nobody can accidentally slide-open the housing. Refer Syno's QIG.
Place the NAS to where you want it to be. Plug in the network and power cable...

As I mentioned in the previous post but the photos might not be as clear as above, the 2 LEDs pointed by the arrows will never blink. Look to the front panel for network connectivity status.
Now opening ceremony, 1... 2... 3... Press the power button...

Applause~
Network detected... Wait for a while and you should hear a beep sound after the NAS booted up properly...

Ok, no orange or red LEDs at the front panel, hardware installation done perfectly. Now my Synology Disk Station DS209 is ready for the software installation.
Related Posts:


Comments
Post a Comment